Intro
Welcome to my first attempt at a blog. Hopefully this will help someone somewhere out there someday in the DFIR community. Since this turned out to be a longer topic than I originally thought, or I'm more long-winded than I originally thought, I'll go ahead and say up front that this is being divided into Part 1 (this entry) and a follow-up Part 2 available at this link.
Defining the Problem
So, to get right to it, here's the challenge that gave rise to this blog entry. My day job at a Fortune 500 corporation is primarily focused on digital forensics, usually of the "deep dive" variety. In the course of investigations that involve disk-based analysis of a given server, dealing with physical hard drives/RAIDS/etc tends to be a very rare occurrence.
The data almost always is in the form of a bunch of files from a virtualized environment (VMware for the content below). More specifically, those files are server clones -- including "pooled storage volumes" (for lack of a better description), meaning a single virtual storage volume written across two or more physical VMDK files.
As a "bonus", most forensic tools (Encase, FTK, TSK, etc) might be able to correctly identify the file type of those VMDK files as LVM (technically, "LVM2" or "type 8e") but they can't stitch the multiple files back together for you into a single volume for purposes such as mounting an intact file system and/or creating a forensic image of the entire thing.
After working on several of these cases and poking around online for answers (while not finding much of anything about LVM from the forensic angle), hopefully the info here can shave off a few hours from the research/try/fail cycle for someone else out there in DFIR-land.
CAVEAT-1: This is still a work in progress, with experimentation and everything else underway while trying to figure out some of the LVM quirks. So if there's a better way to do it than I'm laying out here, other ideas are definitely welcome.
CAVEAT-2: Most of the investigations I work are intrusions, malware, APT related, etc. So the examples here are not shown with the "typical" read only (mount -o ro) options, that would be more of a concern for cases involving human resources, law enforcement, etc. Aside from protecting the original evidence / source VM files (which are on a physical write blocker while imaging them) the main concerns here are to get the files assembled, mounted, imaged, and start the analysis asap.
What is LVM / LVM2?
In a nutshell, LVM is a software layer on top of (or "around"?) the virtual hard disks and partitions, which creates an abstraction for administrative usage to manage hard drive replacement, re-partitioning, backups, and re-sizing disk volumes on the fly. Very handy to address on-demand storage requirements as they change.
The main concern here, for DFIR purposes, is how to get the thing mounted and forensically imaged. But anyone wanting more in-depth information about LVM technology can get get a crash course while reviewing these links (at the very least, I recommend checking out the graphic at https://en.wikipedia.org/wiki/File:Lvm.svg ):
So Let's Get To It
When it comes to doing the analysis and experimentation here, the only things we'll be using are:
- A Windows host system (Server 2012R2 in this case but anything Win7 and later should work just as well),
- A Windows-based forensic tool to examine image files (FTK Imager in this case),
- Virtual machine guest software, i.e., VMware Workstation, to run
- The SANS SIFT forensic platform, available at this link.
And so without further adieu, let's get started. As mentioned above, it's far more common for a pile of cloned VM files to arrive for analysis than for actual server physical hard drives, disk arrays, other RAID, etc, showing up.
In this case, we'll be dealing with Linux Logical Volume Manager server files (with the ext4 file system buried somewhere in there), consisting of 2 storage volumes. One volume is completely self-contained within a single physical VMDK file (numbered 1 below) while the other larger volume is split across 2 physical VMDK files (numbered 2 and 3 below) -- which will cause mounting and imaging problems. The larger/split volume is the star of this show.
The goal is to merge the physical files from numbers 2 and 3 into one logical volume in order to build out the full file and folder structure to be forensically imaged for later analysis.
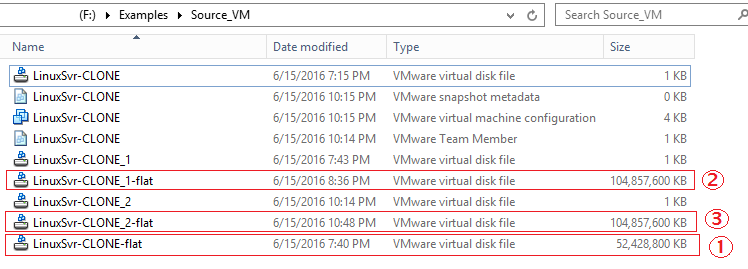 |
| Figure-1 |
In my very-unscientific testing (scrambling around looking for answers while semi-stuck), it seems like recognition of LVM2 files is a hit-or-miss proposition for standard forensic imaging tools. I'm not sure why. But in this instance FTK Imager detected LVM2, so it will be used to take a quick look at the cloned VM files.
After loading the CLONE_1-flat and CLONE_2-flat VMDK files (File >> Add Evidence Item...) with the "Image Files" option under the "Select Source" dialog and then expanding the drop-downs under the "Evidence Tree", it shows the following:
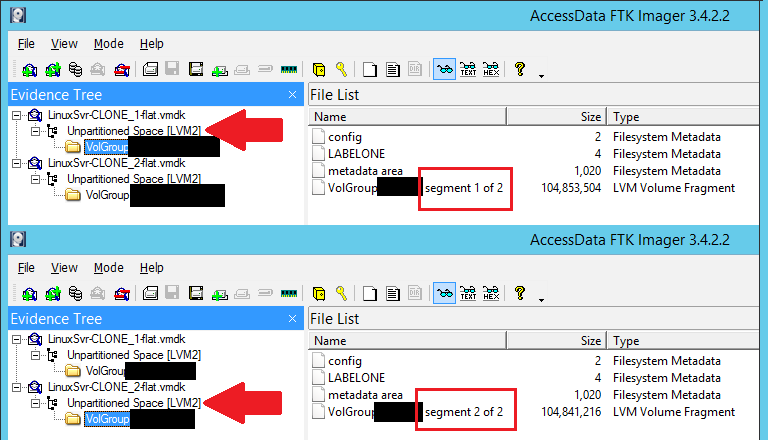 |
| Figure-2 |
We have confirmation that these are Logical Volume Manager files with the [LVM2] label next to the red arrows, which I believe (but still need to research to be certain) is derived from the metadata in the first 1MB of each file.
We also see the administratively assigned Volume Group names (redacted, obviously). Additional key data is found to the right, under the "File List" column, identifying which segment (physical file number) it is along with the total number of expected files in the entire logical group.
So we'll go ahead and image the two VMDK clones as "Raw DD format" (unsplit/unsegmented) files under two separate jobs on FTK Imager. Flash forward and upon completion we see the results -- two individual raw DD image files. Both image files are named after their source VMDK counterparts:
 |
| Figure-3 |
Note that the output image files were written to the Linux-individual-vols directory (unnecessarily redacted by me but... oh well), apart from the original Source_VM input file directory.
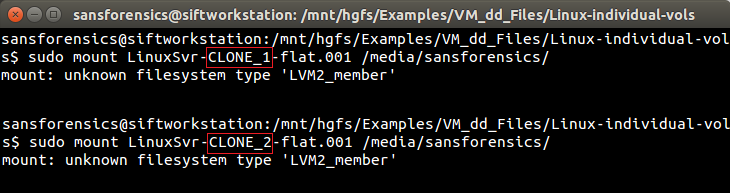
Now it's time to jump over to VMware, fire up the SIFT Workstation, open a shell and see what we have. Logging in as the default user (sansforensics) we'll use ls -l to see the directory contents and make sure the Windows directory containing the CLONE image files is shared with the guest VM SIFT workstation:
 |
| Figure-4 |
So we have access and the two physical LVM2 disk files appear to be imaged into dd format... but are they valid? How do they get mounted and then "merged" or "stitched together" or whatever you want to call it? Let's see if a simple attempt to mount them at /media/sansforensics will work:
 |
| Figure-5 |
OK, so that didn't work. How about using the mmls command from The Sleuth Kit (TSK) to see if we can get some information about the partitions and file systems?
 |
| Figure-6 |
That didn't work either. Maybe running sudo fdisk -l will find something:
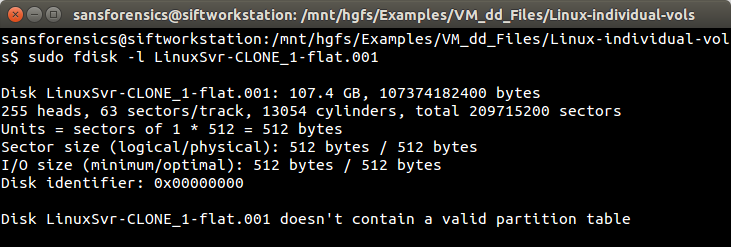 |
| Figure-7 |
Alright. Now we're getting somewhere... just not a valid partition table, though. Both of the CLONE files produce the same error message, BTW. But the information about the disk appears to be valid. Or at least "realistic".
At this point it became time to do some research and here's where we'll fast forward ahead. After reading various online forums written by frustrated-Linux-admin-after-frustrated-Linux-admin, it turns out there's a missing Linux package that needs to be installed... lvm2. And we can confirm if it needs to be installed by issuing the lvm command:
 |
| Figure-8 |
As instructed above, we'll download and install it with sudo apt-get install lvm2...
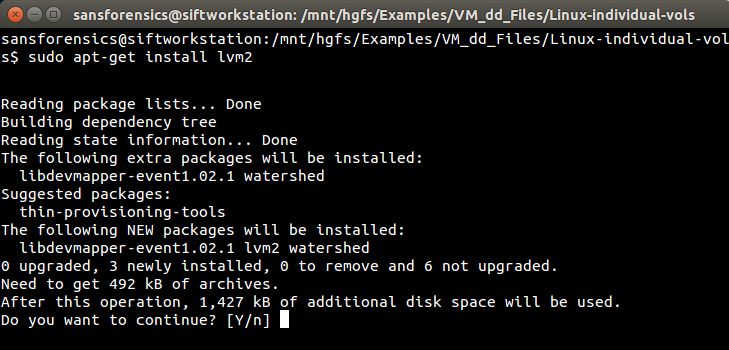 |
| Figure-9 |
Enter "Y", hit enter, and wait a few minutes. Voila - the package was downloaded and installed successfully. Now what? As it turns out, the world of Logical Volume Management has a laundry list of commands to learn... luckily we only need to know a few of them.
A quick crash course is available at:
http://fibrevillage.com/storage/455-lvm-command-reference
Or a more in-depth review of the commands at:
https://access.redhat.com/documentation/en-US/Red_Hat_Enterprise_Linux/4/html/Cluster_Logical_Volume_Manager/LVM_CLI.html
For basic forensic mounting and imaging purposes, the primary commands we're concerned with are:
- pvs - reports information about LVM physical volumes
- pvscan - scans all supported LVM block devices
- lvdisplay - logical volume in-depth information
They'll be used to obtain data needed to feed two other standard commands:
- losetup - mount/unmount the files as loop devices
- dmsetup - manages the device-mapper driver and can force unmounting if losetup doesn't successfully do it (which is often the case)
Returning to the example, first we'll make sure we're in the same directory with the CLONE dd image files (at /mnt/hgfs/Examples/VM_dd_Files/Linux-individual-vols) and then mount the files as loop devices with the command losetup. Note that everything from here onward will require sudo / superuser privileges, so you may want to just sudo -i before doing any of this.
To make this work, it was necessary to put each individual CLONE dd image file on successive loop devices at /dev/loop0 and /dev/loop1, as shown below. If you want it read only, use losetup -r as the command. Just beware that using the -r option sometimes makes LVM uncooperative (not sure why, but "it just happens").
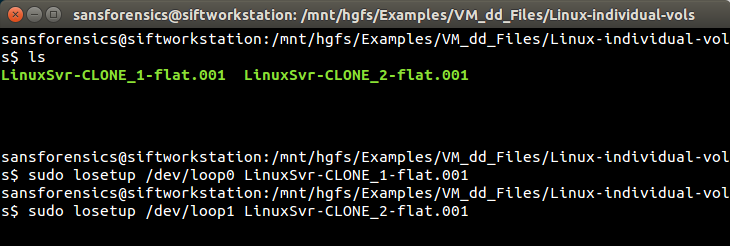 |
| Figure-10 |
There's no feedback as to whether the operation succeeded or failed, so maybe no news is good news. Now it's time to break out the LVM commands and find out where things stand. Using the sudo pvs command, we can see some information about the imaged VMware clones, including the volume group (redacted) that they belong to:
 |
| Figure-11 |
That looks "promising" but it's not enough information to figure out (1) were these physical LVM files successfully combined into one virtual volume? (2) If so, where is it? And (3) can we navigate through it like a "live" mounted file system? It's time to get more in-depth information by using the sudo lvdisplay command:
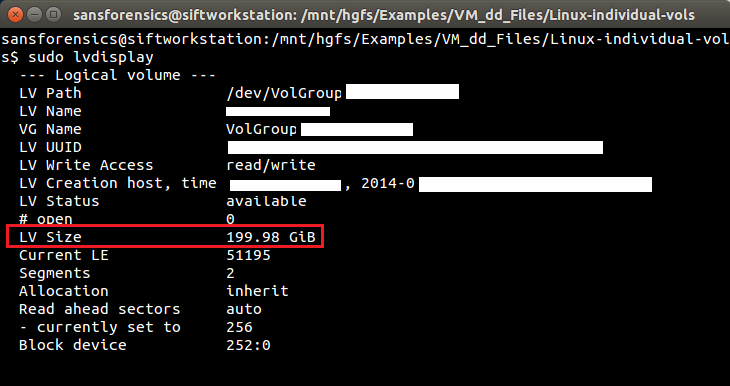 |
| Figure-12 |
Now we have some useful information from the logical volume manager, including LV Size being reported at 200 GB, which would appear to confirm that the two physical dd image files are now properly stitched together and mounted as a single virtual volume.
But the LV Path is also included (showing the device path), which will be useful to know later, in case the device wasn't automatically mounted during the losetup activities. Other potentially useful data includes the VG Name created by the admin and the UUID (a large string of random hex, similar to ef674641-3ab9-8e5c-1dbd-eac810715327a). Let's try sudo fdisk -l again to see if anything has changed:
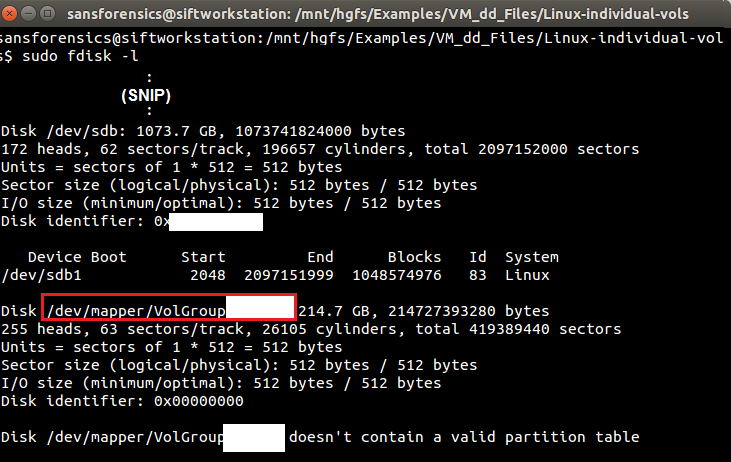 |
| Figure-13 |
Ah. Now there's some very specific information about the 200GB logical volume mapped at /dev/mapper/VolGroup[redacted]. So let's change directories to /dev/mapper and confirm it's there and then try to mount it at /media/sansforensics/ (the local user). Note one more "weird" LVM thing: Sometimes the previous losetup commands [Figure-9 above] seem to automatically mount the device in the local user /media directory. Other times it has to be done manually (I haven't found rhyme-or-reason for it). In short, the mount step here may be unnecessary. But we'll run the commands (since that's how it behaved while making the screen shots):
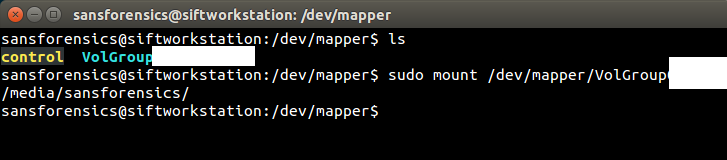 |
| Figure-14 |
No error messages so it looks like the fully assembled logical volume (ext4 file system from a Linux server) should now be properly mounted. But the proof is in the file system navigation, so let's cd into /media/sansforensics and ls -hl the contents to see what happens...
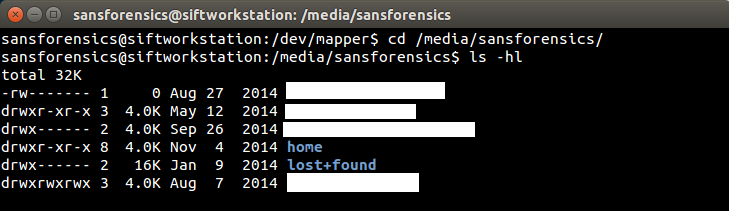 |
| Figure-15 |
Buenísimo! Some actual file and folder structure (most names redacted) from a Linux host. How about a cross-check with the Nautilus file manager? Looks good:
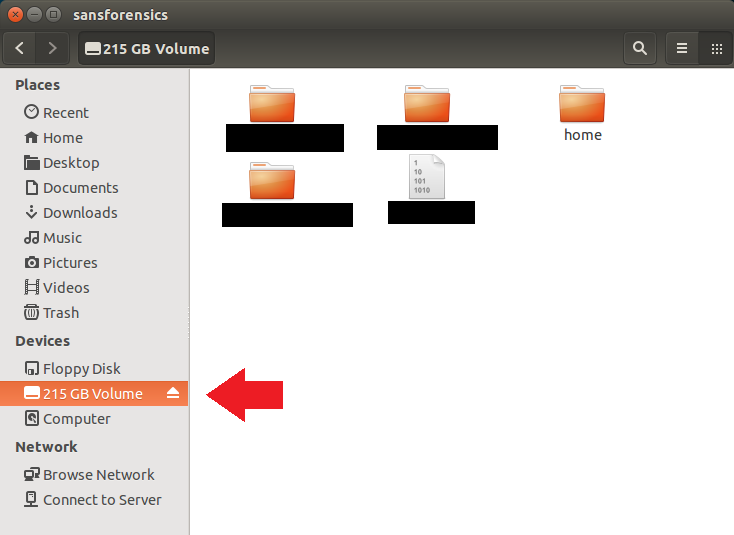 |
| Figure-16 |
As shown above under the Devices heading, the 200GB (technically, 215GB) volume icon appears. If the losetup command initially maps it AND mounts it automatically, the volume "should" show up here... in which case we could have just right-clicked to get the path of the mount point (instead of going through all of the activity above from Figure-9 to Figure-13).
So it looks like we have a properly mounted volume, the Logical Volume Manager software "barrier" is gone, and valid file/folder structure now exists for navigation. If there's a targeted examination to perform, this might be as far as we need to go since the LVM2 volume is fully accessible.
Otherwise if a full forensic image is required, the entirely assembled logical volume can now be imaged. After that, we'll verify that it's a valid image file and then undo all of the "LVM stuff" up to this point, like detaching the loop devices. But since this is a good stopping point, reviewing the imaging and unmounting procedures for the LVM volume will be continued separately in Part 2 at this link.


